
htaccess force HTTPS
So you’ve built your WordPress site you’ve got your SSL certificate, you’ve searched and replaced all of your URLs to sit behind secure HTTPS and when you load your site you see that lovely green padlock in the address bar. So we’re done, right? Well not yet and here’s why.
Let’s open up a private browsing window to mimic how other users would first visit your site. For Chrome users, this means opening the infamous incognito window now let’s type in your website’s URL without the preceding HTTP (yourdomain.com). What comes up? Well unfortunately the regular unsecured HTTP version of (http://yourdomain.com).
Without typing https:// into the browser, which let’s admit no one does, your users and customers will be directed to the insecure version of your site.
SSL Certificates are used to encrypt and protect sensitive data like consumer credit card records and social security details being transmitted throughout the Internet which will give access to only the targeted recipient. When an SSL certificate is used, the data encryptions render the content unreadable to anyone besides the supposed server. It digitally binds a cryptogram key to the data being transmitted. Once the certificate is engaged at the website, it turns on the padlock and the https protocol and permits secure connections from a web server to a browser.
Why would it do such a thing you may ask after I’ve spent all the time to get an SSL certificate and update my URLs? Well, the short answer is the protocols of the internet default to HTTP so you have to force the matter.
Luckily this is actually really easy to do and there are two routes to accomplish it.
- Really Simple SSL
If you are extremely lazy or don’t want to mess with coding anything anywhere then this first route is for you. All it involves is installing a plugin called Really Simple SSL from the WordPress plugin library. Activating it and pushing the button called Activate SSL for force HTTPS to engage. That’s it you’re done.
Now if we try the same trick to view our site in the private browser you see it goes directly to HTTPS and everyone is happy. So that’s the really easy way to do it, but I’m not a fan of installing plugins if I can accomplish the same goal without it. This route will require a little more experience and higher-level access
So if you don’t have access to your CPanel account or don’t know what a CPanel account is then stick with the plugin, it gets the job done. In your CPanel account under File Manager in your public_html file, you will find the .htaccess file. If you don’t see it you may have to enable the setting to view hidden files.
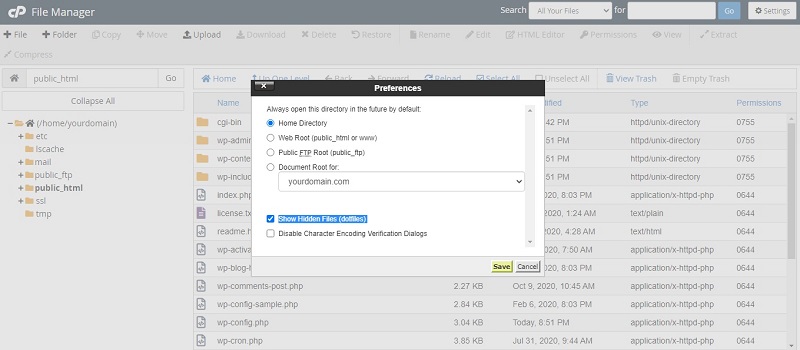
The .htaccess file is hidden by default. Go ahead and open the file into the editor and at the top above the other rules but below the first declaration insert the following lines of codes.
RewriteEngine On
RewriteCond %{SERVER_PORT} 80
RewriteRule ^(.*)$ https://www.yourdomain.com/$1 [R,L]
NB: Replace yourdomain.com with your matching domain name
Save the file and close. And you are done. Adding those rules to the .htaccess force HTTPS is basically what the Really Simple SSL plugin did automatically for you so that you wouldn’t have to venture into this part of your web hosting environment.
Let’s face it most people aren’t willing to mess with stuff back here. I didn’t want to either until I learned my way around better. Anyway, let’s try our little test again in a private browser window and you’ll be happy to see it goes to HTTPS without a problem. I could explain what each rule does but will discuss that in later tutorials.
Of course, when you’re done make sure to clear your website’s cache. I hope this helps you guys take full advantage of your SSL certificate. If the article has been helpful please like and share it with friends and check our knowledgebase section for many resources https://infinitydomainhosting.com/kb/
Other related .htacess articles
htaccess redirect 301 | htaccess force https | htaccess for wordpress | .htaccess redirect to HTTPS
